
Linked List
배열과 같이 선형 자료구조 이다.
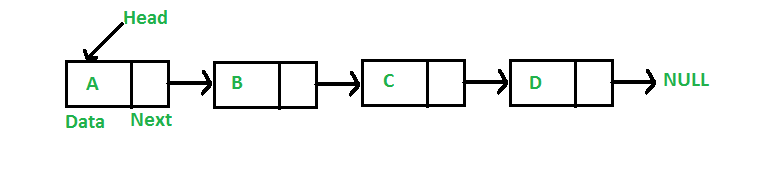
원소들이 메모리 공간상에 연속적으로 저장 되어있지 않고, 그림과 같이 각 원소들이 포인터로 링크되어 있는 자료구조이다.
하나의 원소를 노드라고 표현하고, 데이터를 저장하는 Data 필드와 그 다음 노드를 가리키는 Next필드로 구성되어 있다.
추가적으로 연결 리스트의 맨 처음 노드를 가리키는 헤드라는 포인터를 두고 있다.
그림을 참고하자.
배열과 비교해 연결 리스트가 가지는 장점
베열은 유사한 타입의 선형 데이터를 저장하는데 사용될 수 있다.
하지만 배열은 다음과 같은 제한을 가진다.
- 배열 크기가 고정되어 있다.
그래서 우리는 배열의 상한크기를 미리 알고 있어야 한다.
또한, 일반적으로, 할당된 메모리는 사용량에 관계없이 상한과 동일하다. - 배열에 원소를 삽입하는 연산은 연결 리스트와 비교해 다소 비용이 많이든다.
원소를 저장할 공간이 만들어져야 하며, 특정 위치에 값을 삽입한다면 다른 원소를 한칸 씩 쉬프트 해야할 수도 있다.
연결 리스트가 배열과 비교해 가지는 장점
- 동적 크기
연결 리스트의 크기는 고정되어 있지 않고, 프로그램 실행중에 동적으로 변할 수 있다.
운영체제가 프로그램상의 메모리 공간을 허용하는 한 연결 리스트의 크기를 신경 쓸 필요가 없다. - 원소의 삽입 및 삭제가 수월하다.
배열과 비교해 연결 리스트의 삽입 삭제는 노드들 간에 포인터만 설정해주면 된다.
새로운 원소를 위해 다른 원소를 위치를 쉬프트 한다든지의 수고를 할 필요가 없다.
배열과 비교해 연결 리스트가 가지는 단점
-
임의 접근이 되지 않는다.
배열은 각 원소를 index 번호로 바로 접근할 수 있는 반면(Random access), 연결 리스트에서는 처음 노드부터 순차적으로 탐색해야 한다. -
포인터로 인한 메모리상 추가적인 공간이 필요하다.
배열과 달리 연결 리스트는 다른 노드를 가리키는 포인터(Next)공간을 추가로 요구한다. -
캐시 친화적이지 않다.
배열 요소는 연속된 메모리 공간상에 위치하므로 참조 지역성이 좋은 반면, 연결 리스트는 요소들이 링크되어 있고 메모리 상에 흩어져 존재하므로 참조 지역성이 없다.
Representation
연결 리스트는 첫번째 노드를 가리키는 헤드를 가지고 있다.
연결 리스트에 노드가 없다면 헤드는 NULL이다.
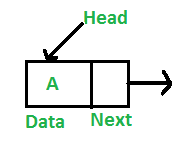
노드는 두개의 부분으로 구성되어 있다.
- Data - 데이터를 저장하는 필드(Integer, Double, String, Object …)
- Next(Pointer Or Reference) - 다음 노드를 참조하는 필드
다음은 자바로 구현한 연결 리스트 클래스이다.
class LinkedList {
    Node head; // head of the list

    /* Linked list Node*/
    static class Node {
        int data;
        Node next;
        Node(int d)
        {
            data = d;
            next = null;
        } // Constructor
    }
}
연결 리스트는 하나의 클래스로 표현되고 있고, 노드는 그 안의 분리된 클래스로 표현되고 있다.
연결 리스트 클래스의 헤드는 노드를 참조하므로 노드 클래스 타입으로 선언 되어있다.
노드 클래스는 데이터를 저장하는 data필드와 다음 노드를 참조할 수 있는 next필드를 가지고 있다. 또한 생성자를 가지고 있는데, 이는 노드가 생성될 때 데이터를 d로 초기화하고, 포인터를 null로 초기화하는 역할을 한다.
위 클래스를 이용하여 노드 3개를 가진 연결리스트를 자바로 구현해 보자.
// A simple Java program to introduce a linked list
class LinkedList {
    Node head; // head of list

    /* Linked list Node.  This inner class is made static so that
       main() can access it */
    static class Node {
        int data;
        Node next;
        Node(int d)
        {
            data = d;
            next = null;
        } // Constructor
    }

    /* method to create a simple linked list with 3 nodes*/
    public static void main(String[] args)
    {
        /* 빈 연결 리스트 생성 */
        LinkedList llist = new LinkedList();

        llist.head = new Node(1);
        Node second = new Node(2);
        Node third = new Node(3);

        /* 3개의 노드가 메모리상에 할당된다.
          head와 second, third가 각 노드를 참조한다.

          llist.head        second              third
             |                |                  |
             |                |                  |
         +----+------+     +----+------+     +----+------+
         | 1  | null |     | 2  | null |     |  3 | null |
         +----+------+     +----+------+     +----+------+ */

        llist.head.next = second; // 첫번째 노드와 두번째 노드를 연결한다.

        /*  첫번째 노드의 next가 두번째 노드를 참조한다.

         llist.head        second              third
            |                |                  |
            |                |                  |
        +----+------+     +----+------+     +----+------+
        | 1  |  o-------->| 2  | null |     |  3 | null |
        +----+------+     +----+------+     +----+------+ */

        second.next = third; // 세번째 노드와 두번째 노드를 연결한다.

        /*  두번째 노드의 next가 세번째 노드를 참조한다.

         llist.head        second              third
            |                |                  |
            |                |                  |
        +----+------+     +----+------+     +----+------+
        | 1  |  o-------->| 2  |  o-------->|  3 | null |
        +----+------+     +----+------+     +----+------+ */
    }
}
Inserting a node
연결 리스트에 노드를 추가 해보자.
노드를 추가하는 데에는 3 가지 케이스가 있다.
- 연결 리스트 맨 앞에 추가
- 특정 노드 뒤에 추가
- 연결 리스트 맨 뒤에 추가
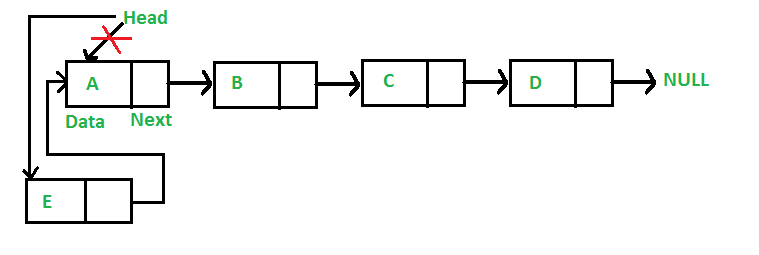
연결 리스트 맨 앞에 추가
- 추가할 노드를 할당한다.
- 노드에 데이터를 넣는다.
- 추가할 노드의 next 포인터가 첫번째 노드를 참조하게 한다.
- 헤드가 추가한 노드를 참조하게 함으로써 처음 노드임을 가리킨다.
다음은 위의 연산을 구현한 자바 메소드이다.
/* This function is in LinkedList class. Inserts a
   new Node at front of the list. */
public void push(int new_data)
{
    /* 1 & 2: Allocate the Node &
              Put in the data*/
    Node new_node = new Node(new_data);

    /* 3. Make next of new Node as head */
    new_node.next = head;

    /* 4. Move the head to point to new Node */
    head = new_node;
}
이 연산의 시간복잡도는 O(1)이 된다.
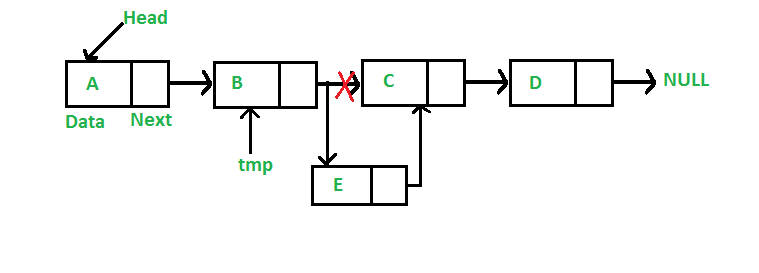
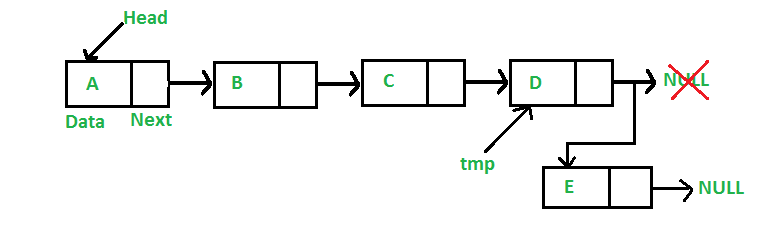
특정 노드 뒤에 추가
- 특정 노드가 null인지 확인한다.
null이면 아무런 작업이 수행되지 않는다. - 추가할 노드를 할당한다.
- 추가할 노드에 데이터를 넣는다.
- 추가할 노드가 특정노드가 참조하는 다음 노드를 참조하게 한다.
- 특정 노드가 추가할 노드를 참조하게 한다.
다음은 위의 연산을 구현한 자바 메소드이다.
/* This function is in LinkedList class.
   Inserts a new node after the given prev_node. */
public void insertAfter(Node prev_node, int new_data)
{
    /* 1. Check if the given Node is null */
    if (prev_node == null)
    {
        System.out.println("The given previous node cannot be null");
        return;
    }

    /* 2. Allocate the Node &
       3. Put in the data*/
    Node new_node = new Node(new_data);

    /* 4. Make next of new Node as next of prev_node */
    new_node.next = prev_node.next;

    /* 5. make next of prev_node as new_node */
    prev_node.next = new_node;
}
이 연산의 시간복잡도는 O(1)이 된다.
연결 리스트 맨 뒤에 추가
- 추가할 노드를 할당한다.
- 추가할 노드에 데이터를 넣는다.
- 연결 리스트가 null이면, 헤드가 추가할 노드를 참조하게 함으로써 연산을 끝낸다.
- 그렇지 않다면, 처음 노드부터 탐색을 시작하여 마지막 노드를 찾는다.
- 마지막 노드가 추가할 노드를 참조하게 한다.
다음은 위의 연산을 구현한 자바 메소드이다.
// Appends a new node at the end.
public void append(int new_data)
{
    /* 1. Allocate the Node &
       2. Put in the data */
    Node new_node = new Node(new_data);

    /* 3. If the Linked List is empty, then make the
           new node as head */
    if (head == null)
    {
        head = new Node(new_data);
        return;
    }
    /* 4. Else traverse till the last node */
    Node last = head;
    while (last.next != null)
        last = last.next;

    /* 5. Change the next of last node */
    last.next = new_node;
    return;
}
이 연산의 시간복잡도는 탐색으로 인하여 O(n)이 된다.
연결 리스트의 끝 노드의 정보를 가지고 있는 tail 포인터를 둔다면, 이 연산의 시간복잡도는 O(1)이 된다.
다음은 위 연산을 포한한 예제 자바 코드이다.
// A complete working Java program to demonstrate all insertion methods
// on linked list
class LinkedList
{
    Node head;  // head of list

    /* Linked list Node*/
    class Node
    {
        int data;
        Node next;
        Node(int d) {data = d; next = null; }
    }

    /* Inserts a new Node at front of the list. */
    public void push(int new_data)
    {
        /* 1 & 2: Allocate the Node &
                  Put in the data*/
        Node new_node = new Node(new_data);

        /* 3. Make next of new Node as head */
        new_node.next = head;

        /* 4. Move the head to point to new Node */
        head = new_node;
    }

    /* Inserts a new node after the given prev_node. */
    public void insertAfter(Node prev_node, int new_data)
    {
        /* 1. Check if the given Node is null */
        if (prev_node == null)
        {
            System.out.println("The given previous node cannot be null");
            return;
        }

        /* 2 & 3: Allocate the Node &
                  Put in the data*/
        Node new_node = new Node(new_data);

        /* 4. Make next of new Node as next of prev_node */
        new_node.next = prev_node.next;

        /* 5. make next of prev_node as new_node */
        prev_node.next = new_node;
    }

    /* Appends a new node at the end.  This method is
       defined inside LinkedList class shown above */
    public void append(int new_data)
    {
        /* 1. Allocate the Node &
           2. Put in the data */
        Node new_node = new Node(new_data);

        /* 3. If the Linked List is empty, then make the
              new node as head */
        if (head == null)
        {
            head = new Node(new_data);
            return;
        }

        /* 4. Else traverse till the last node */
        Node last = head;
        while (last.next != null)
            last = last.next;

        /* 5. Change the next of last node */
        last.next = new_node;
        return;
    }

    /* This function prints contents of linked list starting from
        the given node */
    public void printList()
    {
        Node tnode = head;
        while (tnode != null)
        {
            System.out.print(tnode.data+" ");
            tnode = tnode.next;
        }
    }

    /* Driver program to test above functions. Ideally this function
       should be in a separate user class.  It is kept here to keep
       code compact */
    public static void main(String[] args)
    {
        /* Start with the empty list */
        LinkedList llist = new LinkedList();

        // Insert 6.  So linked list becomes 6->NUllist
        llist.append(6);

        // Insert 7 at the beginning. So linked list becomes
        // 7->6->NUllist
        llist.push(7);

        // Insert 1 at the beginning. So linked list becomes
        // 1->7->6->NUllist
        llist.push(1);

        // Insert 4 at the end. So linked list becomes
        // 1->7->6->4->NUllist
        llist.append(4);

        // Insert 8, after 7. So linked list becomes
        // 1->7->8->6->4->NUllist
        llist.insertAfter(llist.head.next, 8);

        System.out.println("\nCreated Linked list is: ");
        llist.printList();
    }
}
// This code is contributed by Rajat Mishra
Output:
Created Linked list is:  1  7  8  6  4
Deleting a node
이번에는 연결 리스트에서 특정 키 값을 갖고 있는 노드를 삭제 해보자.
- 삭제될 노드를 참조할 temp 포인터와 그 이전 노드를 참조하는 prev 포인터를 둔다.
- temp는 헤드를 참조하게 함으로써 처음 노드를 참조하게 한다.
- 만약 삭제될 노드가 처음 노드라면, 헤드가 temp 다음 노드를 참조하게 하고 연산을 끝낸다.
- 그렇지 않다면, 삭제할 키 값을 가지고 있는 노드를 탐색한다.
- 탐색함에 따라 삭제될 노드와 그 이전 노드 정보를 가지고 있는 temp, prev 포인터들을 갱신한다.
- temp가 null이거나 삭제될 키 값을 가진 노드를 찾으면 반복문을 빠져나온다.
- temp가 null이면 원하는 키값을 가진 노드를 찾지 못한 것이므로 아무런 작업도 하지 않고 연산을 끝낸다.
- 그렇지 않다면 찾은 것이므로, prev 포인터가 temp.next 참조하게 함으로써 작업을 끝낸다.

다음은 위의 연산을 구현한 자바 메소드이다.
 /* Given a key, deletes the first occurrence of key in linked list */
    void deleteNode(int key)
    {
        // 1 & 2. Store head node to temp, prev
        Node temp = head, prev = null;

        // 3. If head node itself holds the key to be deleted
        if (temp != null && temp.data == key)
        {
            head = temp.next; // Changed head
            return;
        }

        // 4. Search for the key to be deleted, keep track of the
        // previous node as we need to change temp.next
        while (temp != null && temp.data != key) // 6.
        {
            // 5. keep track of the previous node
            //    as we need to change temp.next
            prev = temp;
            temp = temp.next;
        }

        // 7. If key was not present in linked list
        if (temp == null) return;

        // 8. Unlink the node from linked list
        prev.next = temp.next;
    }
이 연산의 시간복잡도는 O(n)이 된다.
순수 삭제연산은 O(1)이지만, 삭제될 키 값을 찾아 탐색하는 연산이 추가되었으므로 O(n)이 된다.
특정 키 값의 노드 찾기
연결 리스트에서 특정 키 값 x를 가진 노드를 찾아보자.
search 메소드는 키 값 x를 가진 노드가 존재하면 true, 존재하지 않으면 false를 리턴한다.
- 리스트를 순회할 current를 헤드로 초기화한다.
- current가 null 아닐 때 까지 반복한다.
null이면 while 빠져나와 false 리턴하고 연산을 끝낸다. - current가 참조하는 노드의 데이터가 x라면 true 리턴하고 연산을 끝낸다.
- 그렇지 않다면 다음 노드를 참조하고 2번으로 다시 간다.
다음은 위의 연산을 구현한 자바 메소드이다.
//Checks whether the value x is present in linked list
    public boolean search(Node head, int x)
    {
        Node current = head;    // 1 포인터 초기화
        while (current != null) // 2. current가 null 아닐 때 까지 반복한다
        {
            if (current.data == x)
                return true;    //3. 찾았다
            current = current.next; // 4. 다음 노드를 참조한다
        }
        return false;    // 데이터를 찾지 못하였다
    }
다음은 위 연산을 포한한 예제 자바 코드이다.
// Iterative Java program to search an element
// in linked list

//Node class
class Node
{
    int data;
    Node next;
    Node(int d)
    {
        data = d;
        next = null;
    }
}

//Linked list class
class LinkedList
{
    Node head;    //Head of list

    //Inserts a new node at the front of the list
    public void push(int new_data)
    {
        //Allocate new node and putting data
        Node new_node = new Node(new_data);

        //Make next of new node as head
        new_node.next = head;

        //Move the head to point to new Node
        head = new_node;
    }

    //Checks whether the value x is present in linked list
    public boolean search(Node head, int x)
    {
        Node current = head;    //Initialize current
        while (current != null)
        {
            if (current.data == x)
                return true;    //data found
            current = current.next;
        }
        return false;    //data not found
    }

    //Driver function to test the above functions
    public static void main(String args[])
    {

        //Start with the empty list
        LinkedList llist = new LinkedList();

        /*Use push() to construct below list
        14->21->11->30->10  */
        llist.push(10);
        llist.push(30);
        llist.push(11);
        llist.push(21);
        llist.push(14);

        if (llist.search(llist.head, 21))
            System.out.println("Yes");
        else
            System.out.println("No");
    }
}
// This code is contributed by Pratik Agarwal
Output:
Yes
연결 리스트 연산들의 시간복잡도
시간복잡도 - 최악 기준

접근     검색      삽입     삭제
O(n)    O(n)	 O(1)	 O(1)
Leave a comment